Search This Blog

Showing posts with label advanced lighting. Show all posts

Monday, April 16, 2018

This Week in Game Guru - 4/16/2018

Official Game-Guru News:


I really dig the constant release cycle we're seeing from Game-Guru and TGC now that it's gone to GitHub.  Here are the full details on the 04.14.18 PP (Public Preview) release available on steam:

https://forum.game-guru.com/thread/219574

This one seems to be more of a bugfix/legacy components fix and users are reporting good results.  That means we're inching closer to a production stable build.

There's also some good PBR work being done on Mega Pack 2 (one of my favorites) - get the info here: https://www.game-guru.com/news-post/gameguru-mega-pack-2-dlc-update

New Products On The Store:


Not a lot going on but some interesting stuff.  GraPhix continues his PBR work with a nice looking bus stop.  One thing that stands out is that the glass isn't suffering that awful 'everything past the second pane gets deleted' bug so it should work flawlessly by the look of it.

There's a house set if you're interested by relative newcomer 'Homewreckers studio' and some very nice snow decals by RoseMadder (I always love innovative uses of the decal system).

Lastly there's a Randomized Sound System by Corrosion, who continues his utility scripting.  This particular one looks really useful and I might consider getting it myself.  Definitely give it a view!

Free Stuff:


Honkeyboy has some free mechs (WOO!) here: https://forum.game-guru.com/thread/219571
Bod has revamped his old lighthouses (I'm super excited about this): https://forum.game-guru.com/thread/215012?page=16#msg2599005
JPH-Games keeps adding to his "Industrial PBR pack": https://forum.game-guru.com/thread/219529#msg2599080
Graphix has honestly got too much for me to list. See his megathread here: https://forum.game-guru.com/thread/217932?page=10


Third Party:

There's a pretty big update for AGK but that's really only useful for people using GG Loader, at least from this blog's standpoint.  Beyond that, apologies but I haven't sifted through the mountains of posts on the forum about updates.  Suffice it to say we should expect a lot of integration of utilities in the near future into GG public releases.

Random Acts of Creativity:

So this is the area I'm *MOST* excited about.  We have two mega updates here that need some attention.  Firstly, of course, is Dimoxinil's "Space Losers".  This game continues it's march towards completion and there's also a recipe for cooking eggs buried in there?  That's definitely a new one.
He's added a savegame feature, day/night transition, a friendly NPC, and a village.
Details here: https://forum.game-guru.com/thread/217908?page=4#msg2599091

Next I noticed on the Game-Guru Discord (Yes, that is a thing - it can be found here: https://discordapp.com/channels/332652927082692609/332652927082692609  )

That DuchenKuke had posted a pretty awesome update and test video for his upcoming fallout/STALKER style game.  You can watch that video here (highly recommended as it's informative just in the sense of learning how to use terrain effectively):

This is absolutely gorgeous and he's done a great job.  My comments in full can be found at the video.


In My Own Works:


Ugh.  Don't remind me that I have more work to do.  I added about 3000 words last week to my book, which is pushing 145 pages now, unformatted.  There is a ton of extra work to do.

Monday, April 9, 2018

This Week in Game-Guru - 4/9/2018

Apologies for last week.  I missed the update completely as my day job as Chief Linux Systems Engineer is reaching it's yearly crescendo (culminating in early May) and so I'm finding myself exceptionally busy, compared to what I would only term the 'off season' where it's much easier to focus on secondary tasks, which unfortunately this blog falls into.

As such you may notice for a few weeks a reduced focus on this blog but I promise you it will return as soon as I can steadily manage it.  I'd like to give a quick shout-out to Graphix for a freebie he sent me (unsolicited) as thanks for the blog.  Give his products a look here - he's been doing some great things with the new PBR system. 


OFFICIAL GAME-GURU NEWS:


Not sure what I can say here.  Work continues, Preben is doing a lot of fantastic things with the shaders for DX11 but there's some serious issues that are still being worked on.  So as such we're stuck with a more updated public preview edition but hopefully will see movement forward towards a stable 'release' sometime soon.  To be sure, this is not the upgrade path I'd have chosen if I were Lee.

NEW PRODUCTS IN THE STORE:


Teabone (the king of clutter objects, IMO) has released a few new pieces of high quality clutter objects, notably some paintings.

There's also some interesting medieval horror objects by Lafette that literally the first words out of my mouth were (and I quote): "Wow!  That's.. really really nice.  I mean that's absolutely top shelf stuff."  And the best part is?  They're EXTREMELY WELL PRICED.  I mean the entire pack is something like 7 dollars, US.   This is something on the level of Wizard of ID level of quality, for a fraction of the price.  Definitely worth the investment.


FREE STUFF:


There's a fairly large body of 'free stuff' to go through:
First of all, Bod has made some new PBR remakes of his old stuff that look great!
Second we have Lafette (same one as above) making some 'free little mountains' which honestly are fantastic!  I hope to be able to include them with my book!
Thirdly we have a 'free PBR industrial pack' by JPH Games
Here's a script for making a MOHAA (Medal of Honor, Allied Assault man I haven't played that game in a lonnnng time) style bomb script: https://forum.game-guru.com/thread/219519
And lastly there's a pretty great script set of RPG style functions. 

All in all, a pretty solid week for freebies!


THIRD PARTY TOOLS:


Some news:  The Heightmap Importation tool is being integrated into the GitHub source - eventually!  Still, this is a huge bit of news and I'm excited to see it finally getting it's day in the sun.

Also GG loader by Preben has gotten another update of some underwater shaders.  That guy has a lot of free time.  I don't know how he does it.


RANDOM ACTS OF CREATIVITY:
There's too much to cover (cries quietly)...*takes a deep breath*

Bugsy added cubemapping to some objects in his Redacted2 shooter - https://forum.game-guru.com/thread/216903?page=3#msg2595699

Murmia, that weird game by 'beanz' is coming along nicely: https://forum.game-guru.com/thread/218909?page=1#msg2597459

Death House of Barker Creek by new creator 'HellreaperX' looks like a solid first attempt: https://forum.game-guru.com/thread/219542

Urban Explorer by Tarkus1971 looks promising but needs some fine tuning: https://forum.game-guru.com/thread/219549

Lastly there's a really fantastic update by Cybernessence that needs to be seen to be believed for his Cogwheel Chronicles masterwork.  His day night transitions are looking good! https://forum.game-guru.com/thread/213870?page=4

IN MY OWN WORKS:


The book is making steady progress though a lot of the lower hanging fruit is taken.  One interesting tidbit I posted online which readers of this blog might find interesting is my analysis of what's wrong with using the base AI without a navigation mesh for it:

https://forum.game-guru.com/thread/219508#msg2598602

Check it out.  I'll discuss it in more depth in the book, by a large margin.

Monday, February 5, 2018

This Week In Game-Guru - 2/5/2018

ENGINE UPDATE PROGRESS REPORT


If you keep an eye on https://github.com/TheGameCreators/GameGuruRepo/issues you can get an interesting sense of what is being looked at and what isn't. Currently there isn't a huge amount of 'buy in' for the github repo but it is coming along and in 6-10 months I expect it to be trucking along fairly well.  There's a good body of issues being brought to the attention of Lee and company.  So we'll see but for now, mum's the word.


NEW PRODUCTS IN THE STORE


store graphic

What you see above is the whole of it.  Gtox is adding new weapons (this knife apparently has an alt-attack, which is pretty cool!) and M Stockton has done some great work making a skate parka nd some parking blocks.  High quality models are always good thing!


FREE STUFF


https://forum.game-guru.com/thread/219294 - DuchenKuke has offered a really great variety of free music from his old fallout work.  I love this type of thing and highly encourage people to use it to help differentiate their product from stock offerings.
https://forum.game-guru.com/thread/215012?page=15 - Bod has given us a great deal of things over the years and he continues to deliver.  This time it's a Mallard train, carriage, and a really fantastic looking train station (check out the picture below!).  Make sure you tell him how much you appreciate his work - I think he's getting fatigued a bit and it always helps to hear some encouraging words. 

bod's train station
This is a really brilliant new piece, in my opinion!


https://forum.game-guru.com/thread/219211 - In HonkeyBoy's thread about his survival system, there's a new Lathe that's been added by GraphiX which is pretty impressive and definitely worth a download.

THIRD PARTY TOOLS


Nothing really new and exciting here.  Preben did make an interesting change to GG Loader which apparently improved framerates significantly by reducing draw-calls.  Hopefully this will have some future implementation in Game-Guru.  I have more to do for my notepad API but it's going to be a bit.  I simply have too much on my plate at the moment..


RANDOM ACTS OF CREATIVITY


https://forum.game-guru.com/thread/219296 - DuchenKuke's new project looks promising. 

post apoc, DK style


I love post-apocalyptic games and this one looks like a solid piece.  It's interesting, I've asked him what his method is and he mostly just wings it.  I guess some do have a natural talent for level-building.  Lucky bastard was apparently gifted with it more than I was, apparently. 


https://forum.game-guru.com/thread/217908?page=3#msg2595102 - Dimoxiland has done some major reworking to his "Space Losers" game and I think it's really going places. 


Check out the above video for details.  Very cool stuff.  Check out how clean the scripting and game play is!  Definitely one to keep an eye on.


https://forum.game-guru.com/thread/219258 - Honkeyboy's latest creation - Death by Daylight shows a remarkable increase in level design and proficiency for Game-Guru's most prolific author.  He's got rapid development down to a science at this point and it's really starting to make strides.


https://forum.game-guru.com/thread/219277 - Teabone has done some... very curious...  things with scripting and automobiles in Game-Guru.  Definitely worth a look.

IN MY OWN WORKS


I've made some progress on the Camera system I'm working on.  I have 3 out of 4 of the major pieces I want before I release it.  Once I get the last piece in play, I will build a demo level, zip it up, and sell it (for about $4).  It'll start off on sale at 3.50.  The camera kit will have some very interesting components which I believe most will appreciate.  I may add some niceties to it but that's not required at this point so it may get added down the road. 

After that I have to finish my other two kits.  So keep an eye out for some interesting news there.

Monday, October 24, 2016

Technique Training/Evaluation: Seriously Advanced Lighting for Game Guru (part 4)


NOTE: I POSTED AN ADDENDUM TO THIS TO BE READ AFTER THIS DOCUMENT AS OF 10/31 - Please read this once you've completed this tutorial: http://gamegurureport.blogspot.com/2016/10/lighting-guide-part-4.html

So when I say "seriously advanced" let me just preface that by saying that ... this is still Game-Guru. The lighting engine is still a decade or so behind where it should be.  But we can still fake it well enough to be decent.


WARNING: THIS ARTICLE ASSUMES YOU HAVE READ THE PREVIOUS THREE.

So when I wrote my last lighting article I thought that'd be the last one.  However, I recently had some correspondence with Lee Bamber (@leebamber).  He's the head programmer for the Game-Guru project.  Imagine this guy:

No, seriously, imagine it.
As a programmer.  That's Lee in a nutshell.  He's pretty competent at programming but does it all himself; he takes on advanced topics and tries to make it available for the everyday layman.  Overall, he does ok, which is actually quite the compliment given the magnitude of the task.

Anyways this correspondence basically stemmed around me asking him if there's any way to increase the brightness of the static lighting in game-guru.

The response was nothing less than astonishing.  Lee told me outright that the brightness of the static lights is DIRECTLY tied to the bloom slider.

Think about that for a moment.

So basically the brighter you want your static lights, the higher that bloom slider needs to be.  It's a minor, but incredibly important distinction.

Now let's show that in action.  Here's a screenshot from Wolf's upcoming 'Acythian' cyberpunk game.

There's at least 7 separate lightsources here.  Can you find them all?
Now this isn't a maximum bloom setting, but it's up pretty high.  He's running around 70 or 80, I'd wager.  I realize it's not the latest Deus Ex title, but this is pretty damn good for the Game-Guru Engine.  My wife, a well seasoned gamer, knows well the limits of what she calls a '10 year old graphics engine' when she sees it.  She couldn't believe this came from Game Guru.

Wolf's advice for this particular piece goes back to something I wrote about in part three of the lighting tutorial:

"You increase lightmappingquality to 1000 and lightmappingsizeentity as well (or higher) in the setup.ini. Now you place your lights either according to realism or colorscheme. I have written a lot on that in the past, lets just say here that basic leveldesign rules apply. (This is important because Gurus lightmapper is a bit wonky and so is the post processing which means that bad choices stick out way more than in something like the UE4.)"

If you've read the previous guides, then you know exactly what he means by this.

My own efforts have yielded improved results as well.  Here's a little before and after:
Single light source, default settings.

Well the after looks remarkably similar but the devil is in the details, notably the lines between the shadow and light are far better aliased.  They're smoother; the light range is moderately better on the actual objects in question as well.  Take a look - make sure you open it up in a new window to get a real close look because most of the improvement is very hard to see.  Focus on the shadows on the boxes and in the green crate.


With a single light source, using 1000 quality/1024entity settings in the setup.ini

So if you're not aware, I am using a modification to gameguru called Reshade.  Reshade was brought to us by NomadSoul, who ported it so we can use it.  It's a AAA post processing system which can really improve the quality of your game's output and graphics.  It can't add dynamic lighting or pre-processing stuff though so mostly you're just sharpening up the graphics or adding a filter.

I've messed with it ... significantly... for months.  My first efforts with it were documented here: http://gamegurureport.blogspot.com/2016/01/just-little-update-nomadfx-reshade-mod.html

I have to say that this particular piece is pretty much a 'must have' for Game-Guru.  If you want Game-Guru to look like your game came out in the past 10 years, you need this.

I believe if you want your game to sell, it needs to compete... at least a little.  I can respect the efforts of anyone who puts significant time into their game.  But if you aren't trying to tune it up so people will find it graphically pleasing - you will pay the price.  Interest will wane or collapse.  You will be derided privately and publicly.  Adding post processing and tuning it is part of that process.


As you can see the jaggies are removed, edges are smoothed, bloom is cleaner, lighting is nicer and the tone map is significantly improved.
 
The cartoon setting allows older models to look more like they belong in a modern context.  A lot of older freebie stuff had very simple textures which effectively sent it to background art. 


Note the darker lines and more dramatic color ranges.  It's a fast way to a borderlands-style look.  One thing that WOULD need done is to make a mask for the HUD elements; it's within reshade's protocols so make sure you read the files that come with it.

As you can see there's a lot here that can be done to help create a unified theme for your game or bring it up to a more modern level.  Gamers with lower power cards (this author uses a GTX960) will need to disable Reshade as it will cause a framerate dip.  It assumes you have something capable of running it.


Picking appropriate lighting colors


Inside the GG engine, there's several different lights available.  These choices result in some of the most atrocious color schemes possible.  Unless you are specifically looking for a lime green or neon purple color to an area, you will need to modify these considerably by customizing the colors so they don't wash out your textures.

The best way to do this is to pick a standard color you like (Orange, Green, Blue, whatever) and move it towards the white range.  White effectively is a 'clear' color for the renderer when using static lights.  Let me say that again:

WHITE IS EFFECTIVELY A CLEAR COLOR FOR THE LIGHTMAPPER.

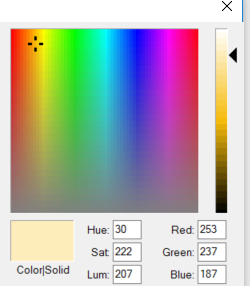
So if you use white lights you will sit around scratching your head wondering why the hell you're not getting any brightness.  What you want to do instead is pick a color like yellow - and move it towards the white range - like this:

This will provide a nice, orange glow.
If you are thinking about how this lightmapper works, it effectively throws a layer on top of the texture, TINTING IT towards the color range you are trying to achieve.  So the 'whiter' it is, the more transparent it applies it towards the texture.  The darker the color, the darker it will apply it.  You can actually make lights and that in and of itself is interesting.

This tinting is applied as a layer which is then controlled in intensity by bloom.  I honestly believe this should be a separate setting.  Why it was tied to bloom I will never understand.

So using my existing scene, I've modified the settings from bloom at 35 up to 80, my usual trick of a light fog to unify colors and lowering the ambient down from 35 to 20.  This is also with the enhanced 1000/1024 lightmapping setting in the setup.ini.

I think this looks much better, don't you?

As you can see the lightmapped objects look phenomenal for something out of a mediocre engine like Game-Guru.  The illumination mapped objects (the Dagored scifi walls and Jackal's free sci-fi container) look awesome with some bloom, really giving them a feel of brightly lit objects.   It's really important not to go overboard here otherwise you will wash out your scene very quickly.  This is especially true with the ambient light levels; if they are set too high with a high bloom setting, you will get nothing more than a retinal migraine.

As usual, I hope these tips and tricks have helped you as they help me.

NOTE: I POSTED AN ADDENDUM TO THIS TO BE READ AFTER THIS DOCUMENT AS OF 10/31 - Please read this once you've completed this tutorial: http://gamegurureport.blogspot.com/2016/10/lighting-guide-part-4.html

If you have any additional comments, leave them below!

Thursday, July 7, 2016

Technique Evaluation: Advanced lighting techniques (lighting part three)

Welcome to 'lighting part three', a tutorial on advanced lighting techniques in Game-Guru. I warn you, this subject matter is heady and can be difficult to really grasp.  It is, however, vital, if you wish to get the best quality in terms of lighting and performance from your Game-Guru engine.

If you've not see the other two tutorials, please do them in order first:
Part 1 - Lighting
Part 2 - Interior lighting

As you will NEED the understanding from those two to get the relevant pieces from this lesson.

So right out of the box let me say that on it's own, the lighting situation in Game-Guru is ABYSMAL.  I mean it's really painfully dreadful in how archaic and primitive it is.  That said, I am a firm believer that you can take even simple tools and craft fine products.  So I've done a lot of the hard work for you to work out the details of what's involved with getting your lighting looking as clean and slick as possible.

I've modified our room from the previous lesson from this:
 Remember this?

To this:


So it's a little dark but you can see I've replaced the chairs with the plasma tubes from the new Sci-Fi DLC.  I've added *ONE* green static light to provide some illumination but these are getting almost all of their color from the illumination map they ship with.

On mapping


What's an illumination map?  Some of the more high quality items on the store or available as DLCs from "The Game Creators, Inc." include what's called a illumination map as well as the standard normal map (Normals create bump-mapping which is introduced via specularity).
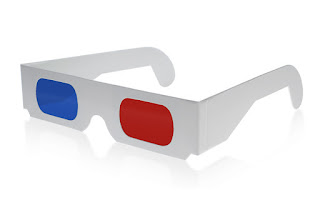
This is how your computer sees a normal mapped texture.
What?  Huh? Spec-u-whatity?  I assumed a level of knowledge you don't have, sorry about that.  Ok so you *PROBABLY* know how textures and mapping work but if you don't the basic concept is similar to wrapping a gift for christmas.  If a plain colored brown box is your model, then texture mapping is the actual gift-wrap.  Think of Normal-mapping as a sort of color coding which introduces a false sense of depth to a two dimensional piece of wrapping paper by putting it in that awful red/blue color with 3d goggles that were such a rage in the 80's.


This is a normal map for a tinfoil texture.
The lighter blue areas create a 'shiny' spot for the rendering engine.  The darker red/blue areas affect the lighting in such a way that it will artificially shadow and shade a two dimensional texture and make it look THREE dimensional even though it's not.  So you end up with some really photo-realistic results.  This is actually a pretty regular way for games to handle three-dimensional rendering these days.  In terms of our gift wrapping example, it's a gift wrapped in three-dimensional holographic paper which looks really awesome with those silly paper glasses on.



A very simple window reflection mask, aka Illumination map.
So going back to it, what's an Illumination map?   Now that you know how a texture map and normal map work; what the hell is an illumination map?  Ok - this takes the whole concept of texture mapping and adds another layer (some applications add many, many more, but this is a very simple one that very many game engines use, including Game-Guru).  It's simply a high-low value which tells the game engine if a portion of the texture should be really bright at all times.  This gives it an appearance of being illuminated (imagine that).

In terms of our gift wrapping example, imagine using neon-light up paint on the three-dimensional wrapping paper.  That's what game-guru is doing here, in that dark room, to make those barrels look green and stand out no matter what.

An important thing to note is that without an illumination map, you are completely relying on the normal map to provide lighting; as such a lit object such as a window, skylight, lamp, etc will never look right without illumination mapping!

Got it? 

Still want to go on?

Good.  From here on, things get much more difficult.  The rewards at the end are worth it though.

There are TWO types of light sources in Game Guru (Hereforth referred to simply as "GG"):  Static and Dynamic types.  A static light source is used when light mapping, as discussed in tutorial #2.  A dynamic light source can be used to light dynamically - meaning it can be turned on/off/etc.

Dynamic light sources are the real weak point here.  While static mapping helps a LOT to alleviate this, they are simply echoes of what you really want to see.  So there are a few principles about dynamic lighting you need to understand.  First is that a dynamic light will shine through walls.  So it will go through a room and into the next one, lighting up those objects.   Further, the engine as of current can only render *2* dynamic lights at any given time in view.  So make sure you plan accordingly; try to make sure if you're using dynamic lights that you do not ever use them in large quantities in an area.  Use them sparingly as spot lighting, to draw attention to an area or illuminate something important. 


What alien?

In the above picture I've got our four plasma tubes and a friendly Alien NPC in our room.  I'm using very low ambient and surface level lighting (10 each) and have four green static lights and one large white static light on the right.   Note the lack of illumination mapping on the ceiling tiles means those light bars don't stand out much.  Also notice there is no green reflection on the alien.  Just a few points of light coming from our sun source which unfortunately will always filter through walls.  Again, not a world ender - just plan around it.

 Oh, there he is!

So at this point what I've done is kept the same light levels but added a green dynamic light of moderate size slightly forward and between the array of objects.  This provides more room lighting overall as well as  a green tint to our alien, which provides a sense of realism.  It still looks.. off but at least is a little more respectable.


Here what I've done is decrease shadows slightly, increase bloom significantly, and increased surface lighting (which is how much light is shown from received sources).  It's definitely got that 'radioactive' feel I was going for now.

Color usage:
- http://planetpixelemporium.com/tutorialpages/light.html
https://forum.game-guru.com/thread/215134
- Saving colors in mspaint for gg use later

Static lighting secrets

First, a quick summary of our principles before we begin:
- Size matters
- Intensity via overlap and clustering
- Overlapping colors
- Mixing dynamic and static lights

Just a heads up - we're changing our example for the rest of this lesson - it will herein be a car parked in a garage (buildings pack, warehouse interiors, small blue warehouse) with a *ZERO AMBIENT LIGHTING setting and very low surface lighting value of 1!

This is a single 500 size static light.

Now let's get onto our first principle - Size matters.  This is relevant not because of the inherent phallic innuendo but because in the realm of static lighting, you are fighting with really weak influences on your environment.  The simplest way to improve that is to simply use a rule of thumb - a static light's size and influence is roughly 1/5th that of a dynamic light. So a size 500 dynamic light needs a size 2500 static light.  Even then it won't QUITE be the same, but it will help significantly cover areas and properly detail lights.  Here's our example with a 2500 size static light:


So in the above, if you go to full size on it, this picture shows very clearly a reasonably well lit car in a garage with traces of light spilling out the door onto the terrain below.  The problem, while it looks *OK* and would quite honestly be acceptable in most cases for a Game-Guru offering,  is that it won't illuminate *ENOUGH*.  So what I've done is this:


I've added a single dynamic light of 500 size.  So you can see here the light is moderately brighter; the walls light up more and you still have light spilling out.  But there's also trace light spilling out through the walls on the sides onto the ground.  If you setup your scene right, people will never notice.  That said, it is an error and it's up to you whether this is the optimum route to take.  Personally I would just use the size 2500 light and make an illumination map for the light piece up top.  I've also found that certain light colors simply don't show up much.  Whites and bright blues, for instance, are pretty bad at lighting scenes.  That said you can improve this by adding MORE STATIC LIGHTS.  Now in my experience this can be overkill; you can totally wash out a scene by using more than three overlapping static lights.  Here's three small (100 size) static lights overlapping right above the car.
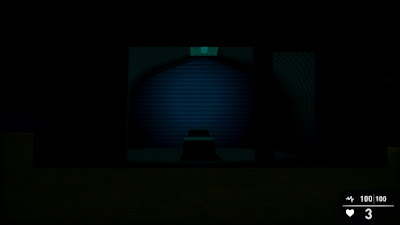

Note the intensity of the weak lighting, it's position, and how it impacts the scene.  It gives the appearance of a dim blue light being cast on the car. It also makes the car LOOK blue.  Red static lights are especially bad at this.


Here we're using several medium (200 size) cyan static lights.  It still washes out the scene but lights up the back wall now.  This, to me, just doesn't cut the mustard.  Compare all that work setting up those lights to just one LARGE (1500 size) cyan light.


Seems like an improvement to me, though it's still not where it should be. So we add a dynamic light!


So basically what we've got here is a large static cyan light (1500) and a dynamic white light (size 500).  This was done to show how to provide emitted lighting while still having cyan contrasting.
We still have the light filtering out the sides so I'd probably use cheap filler models (non-enterable buildings, for instance) on either side to hide the excess dynamic lighting.  Alternately you can make the dynamic light smaller.

SPECIAL BONUS SECTION

Special thanks to Wolf @ the Game-Guru forums for this!
 
Inside of your Game-Guru file, you'll find a 'Setup.ini' file.  It has several lightmapper related settings.  The higher the numbers, the longer it will take for the lightmapper to compile, but the better it will look on static surfaces.
The lower the number.. the more it will look like a travesty like this:
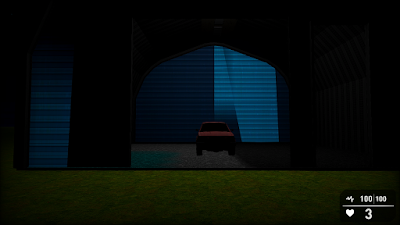

I think I used size 8 quality 8 here?

This is not something I can provide a one size fits all solution to.  I'm going to recommend you try adding up to increments of 128 each time or use 1024 as a starting block.  You'll need to close and reopen Game Guru each time to achieve lighting of sufficient quality.

Also if you recall earlier, I said *NOT* to use white lighting.  This is mostly true.  White lighting for some reason doesn't quite affect textures in a meaningful way.  It helps illuminate a scene, but doesn't really do more than just raise existing values.  So I use this chart:

http://planetpixelemporium.com/tutorialpages/light.html

Note the color values.  This tutorial I just linked above is a HUGE piece of properly lighting a scene.  You want to add to a scene, not detract.  Use your colors to really draw a person in and make them feel at home.  For examples, check out Wolf's Shavra: Renaissance game.  He's got a real good handle on usage of static lighting; he's even written his own tutorial HERE.  Be aware your static lighting is directly proportionate to surface levels in the Tab-Tab screen.  And my last little tidbit - when using static lighting, turn your shadows WAY, WAY down.  Those shadows will interfere with generated lightmapped shadows.  I typically have mine down around 10 or at most 20 for just the barest hint of shadow.

Thanks, let me know if this helped you at all!