Now Game Guru is not breaking any kind of records for most amazing engine, but you can do some very impressive things with it's rather primitive system. However if you don't know what to do, how to do it, and what buttons to push you're going to end up with something that is about as far from AAA as you can imagine.
For the purposes of this demonstration, I'll be using Voodoo's free Sci-fi wall kit. You can find it here:https://forum.game-guru.com/thread/212111 You'll need a game-guru forum account.
I've made as simple rectangular room consisting of a door, a fake door, and 4 corner pieces as you can see:

Not much to see here, yet.
The interior is pretty plain too:

Definitely not much to look at.
So at this point, like a good little gamedev you add clutter elements and discover, to your dismay, that it looks... tremendously amateurish.

Ah yes, nothing says "Bad indy game" like completely absent shadows.
So you check your default lighting settings in Game-guru and discover, to your shock, that you have shadows turned all the way up! How can this be?!

Default settings, ahoy!
Now I'm no fan of the default settings; my previous Technical Evaluation "Lighting in Game Guru", specifically went over ways to improve and unify scenes to bring better quality to your games.
THIS IS EVEN MORE IMPORTANT ON INDOOR SCENES.
Now let's pretend you read the previous article and configured your lighting settings with some bare bones fog, better ambient/surface levels, etc.

You can hardly tell the difference, it just looks darker.
While things don't seem to have changed much, you've already set the stage in the most important ways possible. One major pain of the stock settings is the surface levels being too light and literally reflecting the generated sun's light INDOORS. Scroll back up and look at that first picture. See that far left wall... how much brighter it is? That's because it's reflecting the sun's light, even though it's inside.
To fix this we have to configure indoor lighting. We start with the above - slight fog, unified settings, better ambient/surface values, etc.
Then we have to configure the component pieces (walls, specifically) to be static objects. This is because we'll be using static lighting and the built in lightmapper.

Green is not your friend here.
At this point once you go to the properties on the wall objects you'll see a screen like this. The green means it's a dynamic object. Since this is a wall, it should be static. Choose static and select YES .. then go down to Physics On and choose NO ... this combination will prime the pump, so to speak, for lightmapping.

Next we need to add an interior light. Go to your 'markers' tab on the left of game guru and choose a light source of the color you prefer. I chose white. Place these objects carefully within the perimeter of the room.

The editor's tendency to select irrelevant objects can make this a learned skill.
Make sure at this point you go to the properties on said light object and set it to static as well by setting it's static value to YES. The process is identical to what you did with the bunker pieces. One interesting thing about this is even though you see the light in the editor from the static light, running the game right now will have zero interior lighting. This is because static lights ONLY function in conjunction with the lightmapper.
Please note in the above picture there's still NO INTERIOR SHADOWS. In order for you to get interior shadows, you must use the lightmapper. All we've done to this point is set the stage for that to happen.
To begin lightmapping, open your level and press F1,F2,F3, or F4. F1 is the fastest, F4 is the longest. In order to do proper interior lighting, you must use F3 or F4; F1 and F2 don't seem to do much of anything with respect to interior lighting.

Depending on your level size this can take between a minute or a day and a half.
Hopefully your lightmapping went well the first time and you won't have to do it again. I had to add an additional light over the chairs and reposition it two or three times before I got the desired result as seen below:
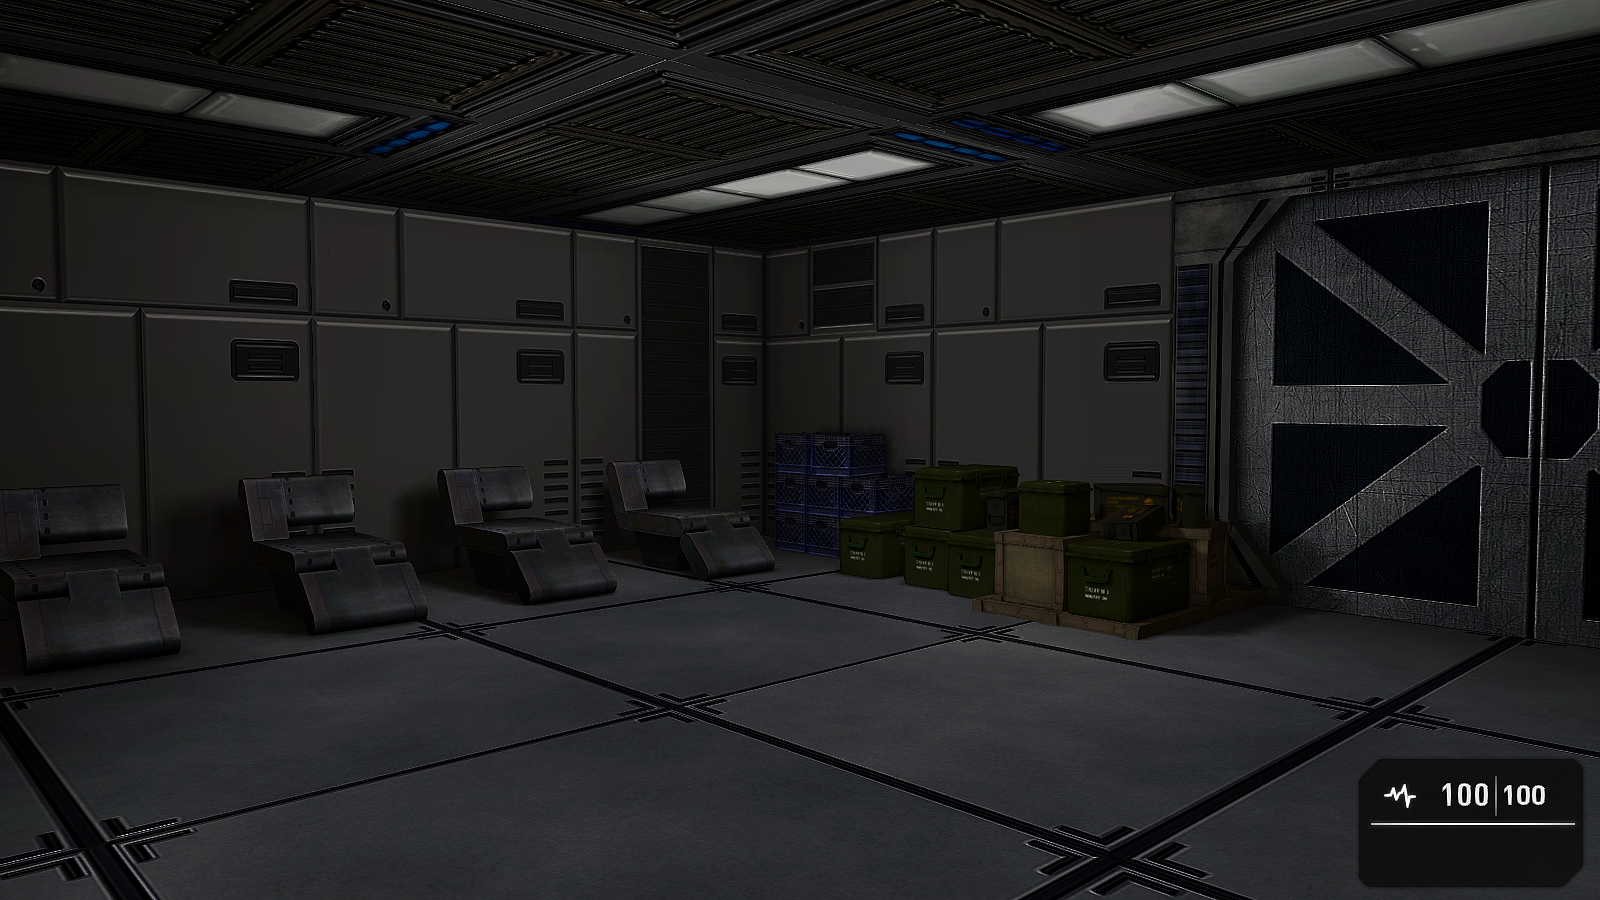
Now we're talking!
As you can see, the lighting is significantly improved. Shadows add depth and realism, lighting takes on a more natural look. There's a few caveats - some objects don't produce shadows properly; flashlights never completely get rid of lightmapped shadows, etc. But overall, it's a massive improvement. Don't take my word for it - just check out the comparison shot below:
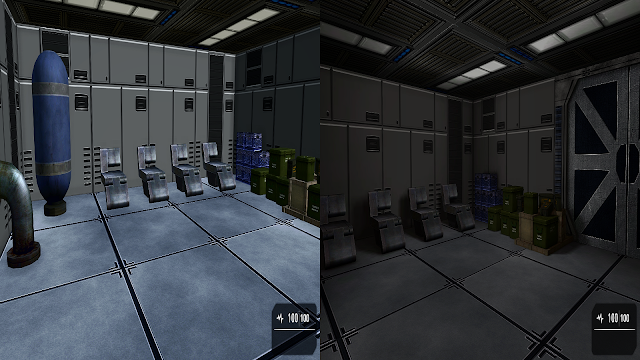 It's not even close.
This will give you beautiful interior lighting which you can control the intensity of the shadows via the slider on the tab-tab settings screen. Again, you may need to play with the lighting a few times, or the level color/etc but it doesn't take too much work to further improve it from the above to a finalized version such as the one below:

While you're not going to fight 300 million dollar budgets and win, this certainly is a far cry superior to the initial results; the above is my attempt to create a dark, musty spaceship that seemed like it'd been abandoned for a long time. Aside from the blood sticking out too much, I'm tremendously pleased with the results. Hopefully this has been of help to you. If there's anything you learned here, please feel free to tell me in the comments.
Thanks and see ya soon!


